

How (not) to use the Proxmox 7 VNC API
| 6 minute read
If you’ve been following my LinkedIn, you might know that I’ve been driving myself crazy trying to figure out how VNC over Websockets work, specifically, how to get a VNC shell on a remote VM in Proxmox.
Computer Science House uses Proxmox extensively for our infrastructure. From LDAP and SSO-related services like Keycloak and LDAP, to web infrastructure like our public site, and URL mappings for home directories. For the longest time, we also had OKD, our container orchestration platform, hosted on there as well.
Proxmox has an… okay user interface available for managing your virtual machines, and that’s what we, the RTPs, use to manage our core services. It works well enough, and gives you acess to most of the functionality you need for serious hypervisor management.
However, the interface has a few critical flaws that make it difficult to use for the average CSHer, especially someone who is new to hypervisors:
- The interface is pretty complicated. There are a lot of bells and whistles that the average user isn’t going to want or need to touch.
- Proxmox doesn’t integrate well with our SSO system. We could script account creation, but it’d be extra work.
- This is probably the most important thing: We cannot impose resource limits using Proxmox. RAM doesn’t grow on trees, so we have to have some way to prevent people from allocating 69GB of RAM to their Minecraft server.
Enter Proxstar. Proxstar is a Virtual Machine configuration and management interface written in Flask. It takes advantage of the Proxmox API and Proxmoxer to provide a clean and simple way for users to access our VM infrastructure, and for RTPs to impose limits to things like CPU, RAM, and storage. You can create VMs, install (RTP approved) ISOs, install an SSH key, and open a noVNC console.

That last point is the subject of today’s blog post. Let’s dive in.
The Current State of Things
In 2017, Jordan Rodgers created Proxstar to do all of the above things. He used Proxmoxer to interface with the API, pyOIDC to authenticate people, and a CSH library called CSH-LDAP to pull in account details. This all worked great, but there was one really crucial thing missing: console functionality. This was crucial because, sure, you could tell the API to create a VM, set it to have these resources, and even interface with our DNS servers to get a hostname and IP address and all that jazz, but if you couldn’t get a console or shell in or anything, what good was that?
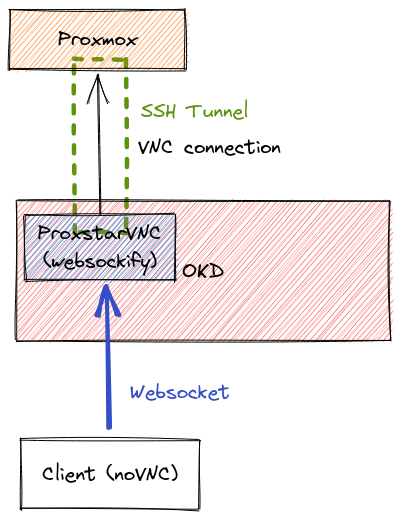
So, he did something that I think was hacky as all get-out, but was actually super clever. Proxmox sits atop QEMU, and exposes a lot of QEMU’s guts to the user, such as its VNC server functionality. By configuring this VNC server, you can connect to a port on the Proxmox host itself and gain graphical console access to a VM. In Proxmox 5 and 6, there was an API route you could hit to change the settings of this VNC server exposed by any given VM, on the fly. Jordan took advantage of that by using the API to configure a VNC connection on-demand, then using Websockify to connect to that port and that node, start up a noVNC instance on the client’s computer, connect to that Websockify instance, which would then send VNC traffic between the server and the client.
One (ok, well, two) small issues: The first one is that in order for this to be possible, you’d have to open quite a large range of ports on each node’s firewall (something like 5900-6000, at least). That, as you might guess, is a security hole. For infrastructure that’s supposed to host the beating heart of CSH, that’s unacceptable. The second issue is that VNC traffic is not encrypted. So, even if you did open the port, you’d be sending keystrokes and frame data through CSH’s network (between the proxmox servers and the OKD project that Proxstar lives on) unencrypted. In theory, this is fine, because we own the network, but it’s really not good practice. (The websocket connection is secured, so Proxstar to you is a non-issue)
To get around this, Jordan gave SSH credentials to Proxstar for it to open an SSH tunnel to forward VNC traffic through. Clever, if a bit hacky. It worked prettty well, until Proxmox 7.
This route still exists in Proxmox 7, but due to a regression in QEMU, you can no longer change these settings on the fly. Instead, you have to add the VNC configuration in the QEMU config file pertaining to a host, then reboot the host. I actually tried to patch Jordan’s code to make this possible, but it was a complete mess, didn’t work half the time (I blame Proxmox), and even if it did, you’d have to reboot your VM to get a console.
For a while, I thought I was screwed, and didn’t touch the code. I had actually noticed problems with VNC (until it straight-up stopped working) all the way back in 2020, but I was too afraid to touch the code because I wasn’t sure I could make heads or tails of it. Eventually, though, I sucked it up, and went looking for a solution.
They Went Looking for a Solution
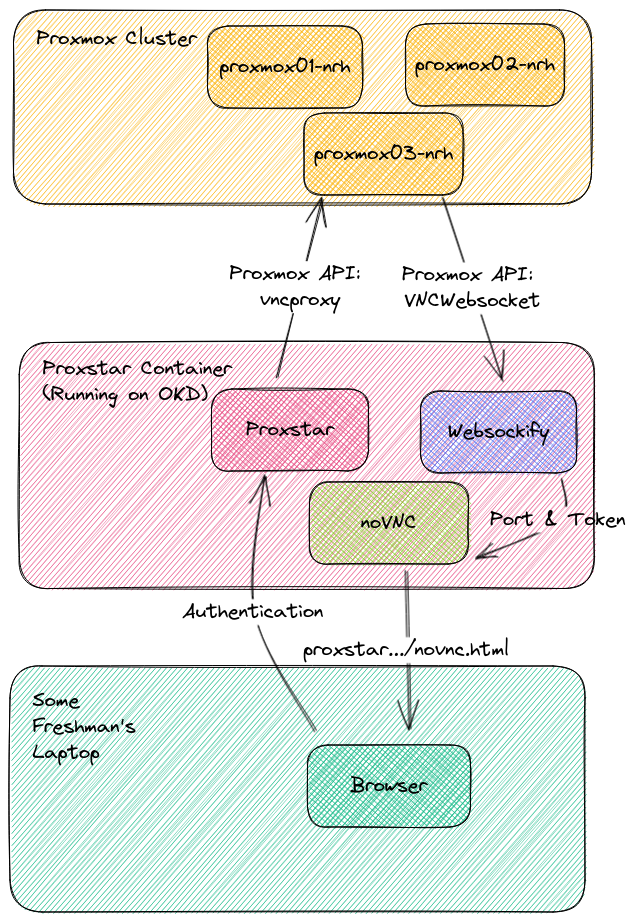
I found it in the API, quite early on, in fact. In my preliminary research on this topic, I stumbled upon the vncproxy route and the vncwebsocket route. With a little help from a noVNC client and Websockify, you can use the first route to prompt the server to open a “TCP VNC proxy connection.” That will return a ticket and a port. Using Websockify, you can open a connection to the proxmox node on the given port, and then forward incoming traffic to that port.
The second route is highly misleading. The reason for this is that typically, the way a websocket works is that you’d call an API endpoint using a WebSocket library with the extension wss://. You and the server would negotiate an UPGRADE to the connection, and then you’d have a websocket.
Fireship has a pretty good video explaining the basics of a websocket.
Unbeknownst to me, Proxmox’s vncwebsocket API route is not at all what it seems. In reality, after calling vncproxy, Proxstar spends 10 seconds listening for a connection on the port it returns. If you point a websocket-based VNC client (like noVNC) at that server and port, presto! You’ll have a VNC session. The ticket provided with the port is used as the password (this is not documented, of course).
Now, this is roughly how it works.
At this point, I want to make two quick shout outs:
Thanks to Joe Abbate for helping me out with the implementation of all this, both the proof-of-concept, and in production. He’s really smart and if you are a recruiter, you should hire him.
Thanks to Jordan Rodgers, the original inventor of Proxstar for helping me through this whole process.
Try It at Home!
I’ve got demo code available on GitHub that should show you exactly what steps you need to take to get this working on your own cluster. Simply download the dependencies, add credentials, and run the script. The automated chrome-based browser.get() call is only tested in macOS, but it should spit out the requisite information to get it working manually. If you have any problems, stories, or info to share, I implore you to open an issue, because as the proxmox staff have said, this functionality is very poorly documented.
Cheers,
- Willard